Collection View에서 복잡한 레이아웃을 다루기 위해선 Custom Layout을 적용시켜야 합니다.
오늘은 Custom Layout을 탐구해보려 합니다.

데이터 레이어와 프레젠테이션 레이어가 분리되어있고 레이아웃으로 뷰의 배치를 결정합니다. (책임이 잘 분리되어 있습니다.)
CollectionViewFlowLayout
CollectionViewFlowLayout는 애플이 제공하는 UICollectionViewLayout의 한 유형입니다. 애플은 최적화와 추상화가 잘 되어있기 때문에 가능하면 FlowLayout 사용을 권장하고 있습니다. Flow Layout인 이유는 그림으로 설명드리겠습니다.

스크롤의 방향에 따라 선을 기반으로 가능한 한 많은 셀을 배치하고 다음으로 넘어갑니다.
다음은 Flow Layout 설정 순서입니다. (링크)
1. FlowLayout 객체를 만들고 Collection View에 할당합니다.
2. 셀의 너비와 높이를 설정합니다.
3. 필요하다면 items or lines의 간격을 설정합니다.
4. Section Headers or Section Footers를 원한다면 이들의 사이즈를 명시해야 합니다.
5. 레이아웃의 스크롤 방향을 설정합니다. 기본값은 vertical입니다.
itemSize를 설정하면 모든 셀의 크기가 동일해집니다.
  override func viewDidLoad() {
        super.viewDidLoad()
        collectionView.delegate = self
        collectionView.dataSource = self
        let flowLayout: UICollectionViewFlowLayout = UICollectionViewFlowLayout()
        flowLayout.itemSize = CGSize(width: 100, height: 100)
        collectionView.collectionViewLayout = flowLayout

    }
반면에 동적으로 사이즈를 지정하고 싶다면 UICollectionViewDelegateFlowLayout를 준수하여 메서드를 구현해야 합니다.
    func collectionView(_ collectionView: UICollectionView, layout collectionViewLayout: UICollectionViewLayout, sizeForItemAt indexPath: IndexPath) -> CGSize {
        return CGSize(width: 10 * Int.random(in: 5...10) , height: 10 * Int.random(in: 5...10))
    }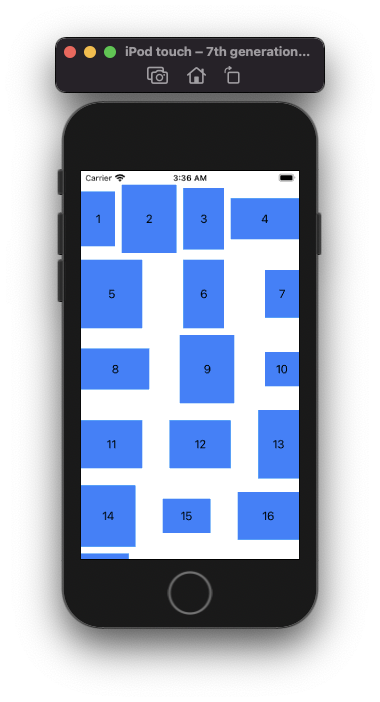
이렇듯 셀의 크기가 다를 경우 한 행에 들어가는 Cell의 수가 바뀔 수 있습니다. 또한 행의 height 크기는 가장 큰 Cell의 크기로 결정됩니다. (스크롤이 Vertical일 경우입니다.)
Spacing 설정

최소 간격을 설정할 수 있으며 Leading과 Trailing 쪽은 간격이 생기지 않습니다.

Line 간 간격은 일정하지만, Item 간 간격을 다를 수 있습니다. Line 간 간격은 각 Line별 가장 큰 Item 크기로 인해 정해집니다.
물론 이 간격들은 UICollectionViewDelegateFlowLayout를 준수하고 메서드를 구현해서 동적으로도 바꿀 수 있습니다.
아래는 관련 함수입니다.
collectionView(_:layout:minimumLineSpacingForSectionAt:) collectionView(_:layout:minimumInteritemSpacingForSectionAt:)
Section Insets을 이용하여 Content의 Margins을 조정하기
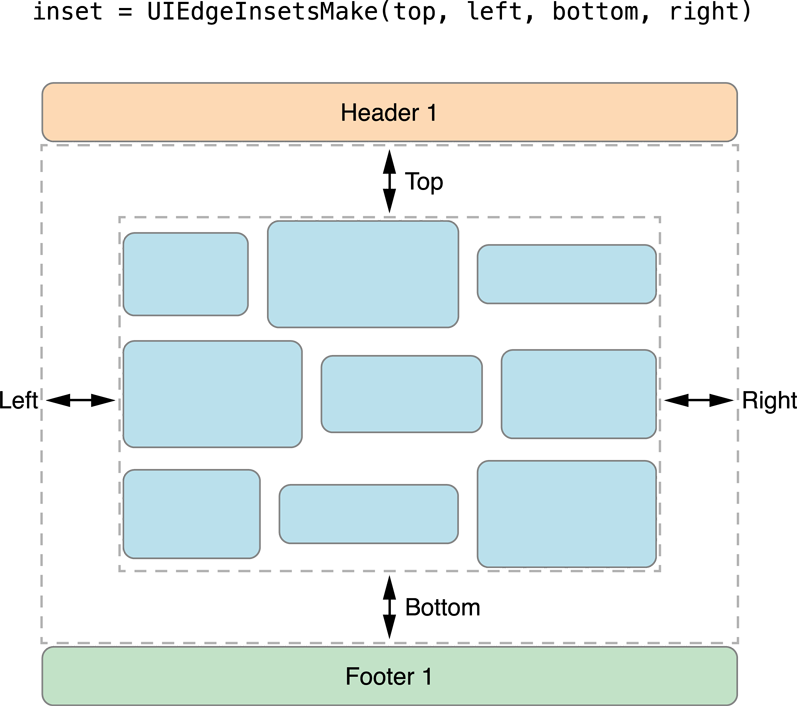
sectionInset 프로퍼티에 Inset을 할당함으로써, 각 Line별 Cell의 수를 제한할 수 있습니다.
Margin과 Padding이 같은 여백이기 때문에 헷갈릴 수 있는데요. Margin은 Content 외부 여백, Padding은 Content 내부 여백으로 이해할 수 있습니다.
FlowLayout을 Subclassing 해야 할 때
종종 필요한 동작을 위해 FlowLayout을 Subclassing 해야 할 때가 있는데 이에 대한 시나리오들입니다.
1. Layout에 새로운 Decoration View나 supplementary를 넣고 싶을 때
2. flow layout에 의해 반환되는 레이아웃 attributes를 수정해야 할 때
3. Cell이나 View에 새 레이아웃 attributes를 추가하려는 경우
4. 삭제, 또는 삽입되는 item의 초기, 또는 최종 위치를 지정해야 할 때
이때 Subclassing Tip은 링크 맨 아래에서 찾을 수 있습니다.
아니면 아예 Custom Layout을 직접 만드는 것이 올바른 방법일 수도 있습니다. 하지만 FlowLayout을 통해서 충분히 해결 가능한지 고민해야 합니다. FlowLayout은 최적화가 많이 되어있고 많은 기능을 제공하고 있습니다.
Custom Layout을 만드는 경우는 아래와 같을 것입니다.
1. Line이나 Grid 기반 배치와 다르게 보이는 Layout
2. 스크롤 방향이 2개 이상
3. 모든 셀 위치가 너무 자주 변경되어 flow layout을 수정하는 것보다 Custom layout을 만드는 게 효율적일 경우
UICollectionViewLayout
Custom Layout을 만들기 위해선 UICollectionViewLayout을 Subclassing 해야 합니다.
몇 가지의 methods가 핵심 동작을 담당하며 나머지 methods는 필요에 따라 override 하여 사용합니다.
아래는 핵심 동작입니다.
- 스크롤 가능한 공간의 크기 지정
- CollectionView가 각 셀과 뷰의 위치를 지정할 수 있도록 레이아웃을 구성하는 셀, 뷰에 대한 attribute objects 제공
Core Layout Process의 이해
CollectionView는 필요하다고 판단하면 Layout 객체에 이를 요구합니다. 예를 들어 처음 표시될 때, 크기가 조정될 때 레이아웃 정보를 요청합니다. layout의 invalidateLayout()을 이용하여 기존 레이아웃 정보를 버리고 새 레이아웃 정보를 생성하게 할 수 있습니다.
invalidateLayout() vs reloadData()
문서에는 invalidatelayout()과 reloadData()가 레이아웃 프로세스는 동일하지만 이 두 가지 메서드를 혼동하지 말라고 합니다. 이유가 뭘까요? 간단한 실험을 해보았습니다. 첫 번째 데이터 값을 100으로 변경하고 각각의 함수를 호출했을 때입니다.

    override func viewDidAppear(_ animated: Bool) {
        datas[0] = 100
        sleep(3)
        collectionView.collectionViewLayout.invalidateLayout()
    }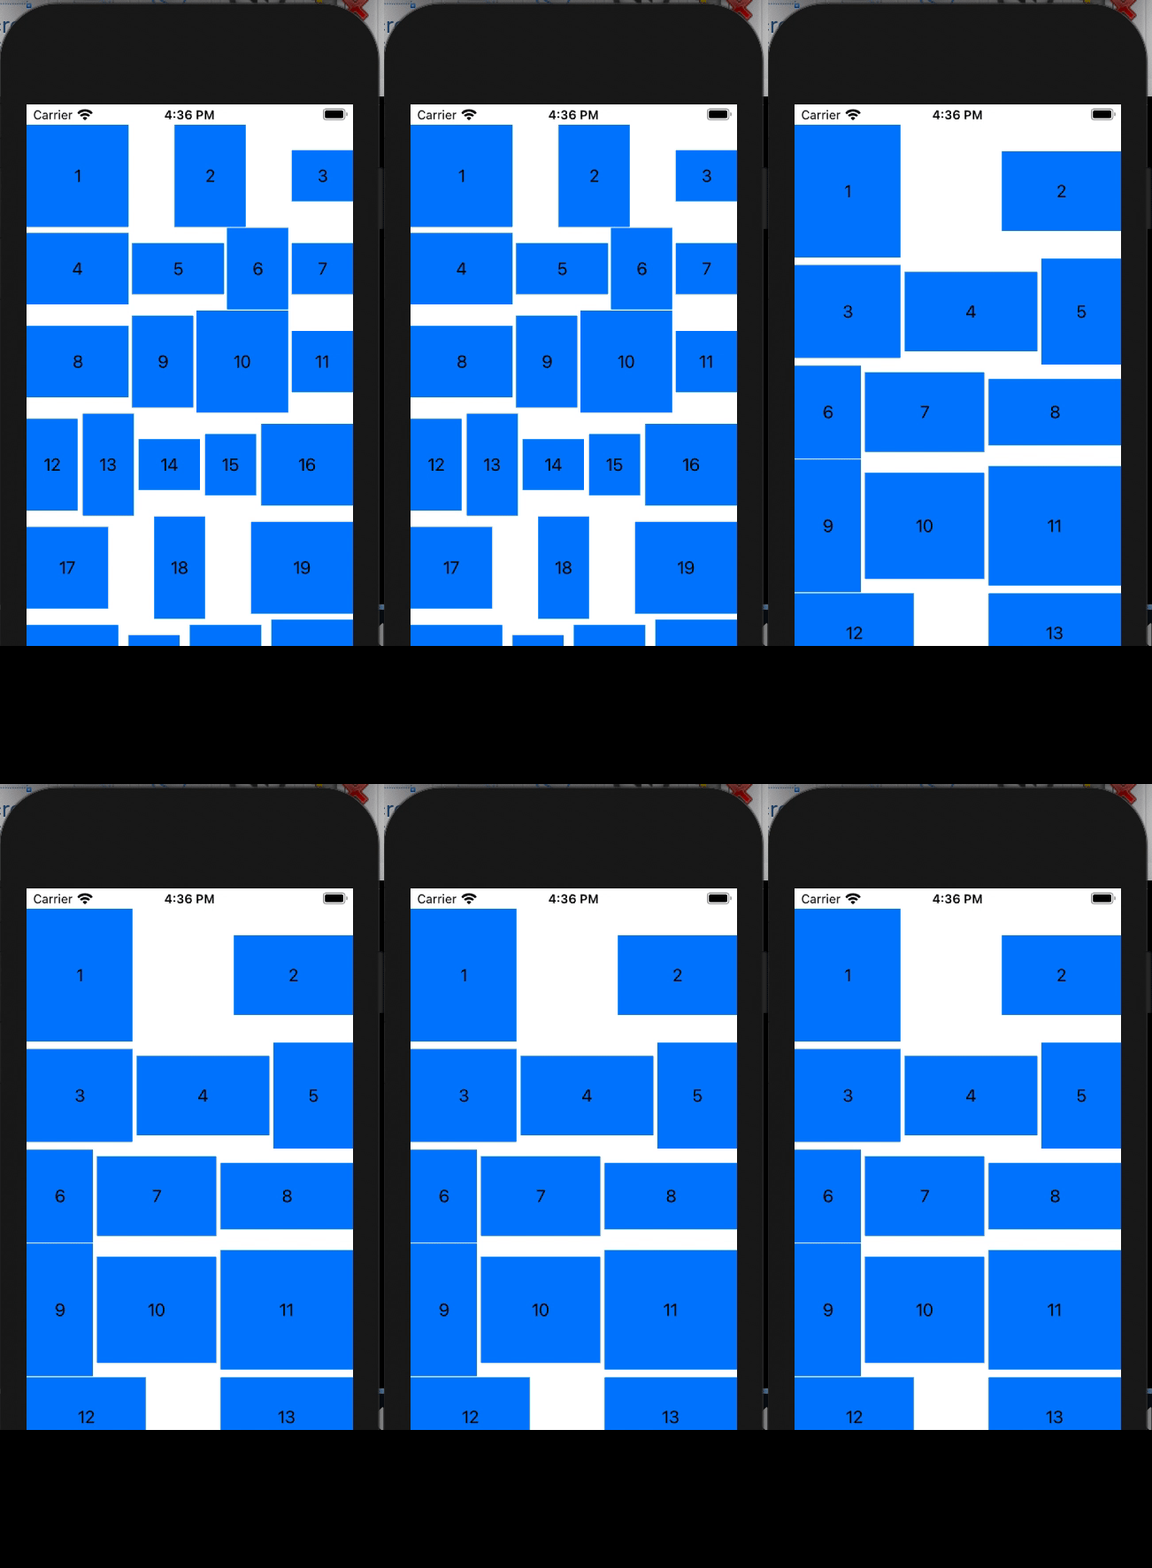
먼저 invalidateLayout()입니다. 애니메이션을 확실히 보여주기 위해 다음 레이아웃을 조금 크게 지정하였습니다.
    override func viewDidAppear(_ animated: Bool) {
        datas[0] = 100
        sleep(3)
        collectionView.reloadData()
    }

reloadData()입니다. reloadData()는 애니메이션이 작동하지 않습니다. (UIViewPropertyAnimator를 이용하였습니다. 하지만
UIView.animate()를 이용해도 동일한 결과가 나옵니다.) 같은 레이아웃 프로세스임에도 애니메이션에선 다른 결과가 나옵니다. 여기에 대해선 나중에 애니메이션에 대해서 탐구해볼 생각입니다. 애니메이션 말고 차이가 보이시나요?
invalidateLayout()은 레이아웃만 업데이트되고 reloadData()는 변경된 데이터까지 적용됩니다.(1번 cell을 유의 깊게 봐주세요) 애플은 reloadData()는 꼭 필요할 때 사용하라고 합니다. 레이아웃만 업데이트하고 싶을 땐 invalidateLayout()만 사용하는 것이 성능상 유리해 보입니다. :)
또한 invalidateLayout()은 즉시 업데이트가 되는 것이 아닌, 업데이트를 예약하고, 다음 view update cycle에서 수행됩니다.
Layout Process
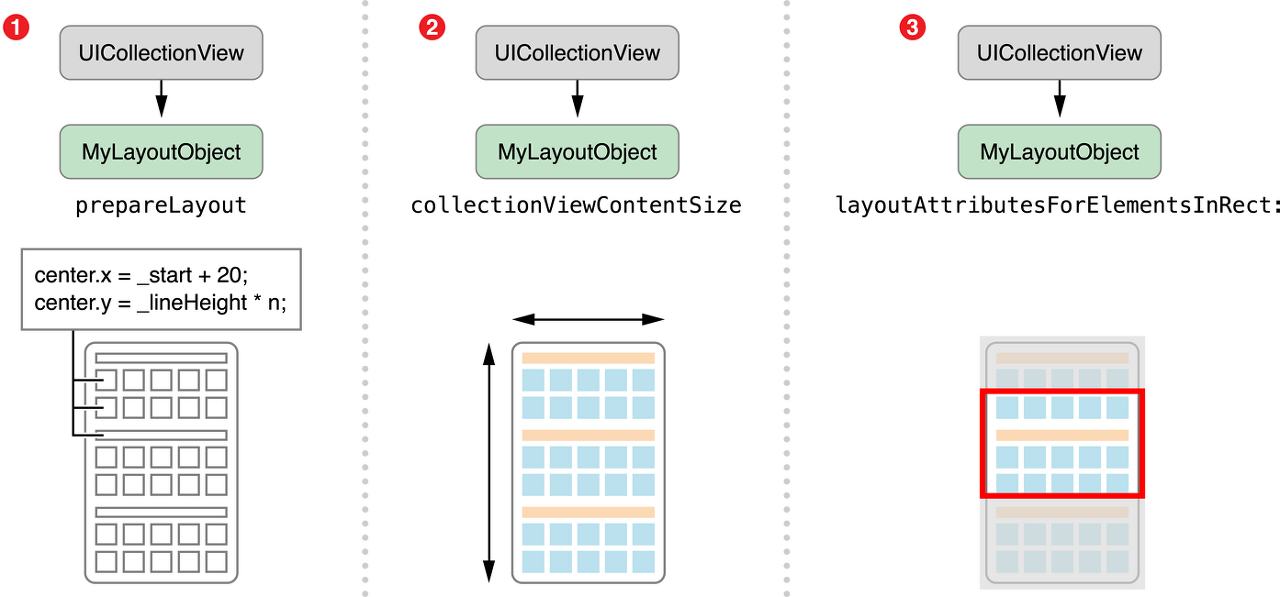
1. prepare() 함수로 레이아웃 정보에 필요한 초기 계산을 진행합니다.
2. collectionViewContentSize를 통해 전체 prepare() 계산에 근거하여 content크기를 반환합니다. 이를 통해 CollectionView는 적절한 ScrollView를 생성합니다.
3. 현재 스크롤 위치를 기반으로 layoutAttributesForElements(in:)를 통해 지정된 사각형 내의 모든 셀과 뷰에 대한 레이아웃 속성을 반환합니다. 이를 통해 사각형 영역 내의 셀 및 뷰의 속성을 요청합니다. (영역 내에 있는 UICollectionViewLayoutAttributes 객체를 배열에 추가합니다.) 하지만 사각형은 보이는 영역과 같을 수도 있고 다를 수 도 있습니다.
이렇게 프로세스가 끝나면 CollectionView의 layout이 invalidate 할 때 까지는 레이아웃을 유지합니다. 다르게 말하면,
invalidateLayout()을 호출하거나, 스크롤했을 때 shouldInvalidateLayout(forBoundsChange:) 이 함수가 true를 반환하면 다시 prepare()부터 계산이 들어갑니다.
UICollectionViewFlowLayout과 달리 단방향 스크롤을 강제하지 않습니다.
Layout Attributes 생성
UICollectionViewLayoutAttributes는 간단히 말하면 cells, supplementary views, and decoration views를 어떻게 보여줄지에 대한 정보를 저장하는 곳입니다. 앱에서 수천 개의 item을 다루지 않는다면 layout을 생성할 준비를 할 때 instance를 만드는 게 좋습니다.( 그동안 정보가 계산되는 게 아니라 cached 될 수 있고 referenced 될 수 있으니)
만약 캐싱하는 것보다 모든 Attribute를 그때그때 계산하는 게 효율적이라면, attributes를 요청받는 순간에 생성하는 게 낫습니다.
성능 고려
UICollectionViewLayoutAttributes는 prepareLayout method에서 만들거나 기다렸다가 layoutAttributesForElements(in:) method에서 만들 수 있습니다. 애플리케이션 요구 사항에 따라 요청을 받을 때만 UICollectionViewLayoutAttributes를 생성하는 게 성능이 더 좋을 수 있습니다. (item이 몇 천 개 될 경우) 아래 공식문서 코드로 예시를 보여드리겠습니다.
lass MosaicLayout: UICollectionViewLayout {

    var contentBounds = CGRect.zero
    var cachedAttributes = [UICollectionViewLayoutAttributes]()

    /// - Tag: PrepareMosaicLayout
    override func prepare() {
        super.prepare()

        guard let collectionView = collectionView else { return }

        // Reset cached information.
        cachedAttributes.removeAll()
        contentBounds = CGRect(origin: .zero, size: collectionView.bounds.size)

        // For every item in the collection view:
        //  - Prepare the attributes.
        //  - Store attributes in the cachedAttributes array.
        //  - Combine contentBounds with attributes.frame.
        let count = collectionView.numberOfItems(inSection: 0)

        var currentIndex = 0
        var segment: MosaicSegmentStyle = .fullWidth
        var lastFrame: CGRect = .zero

        let cvWidth = collectionView.bounds.size.width

        while currentIndex < count {
            let segmentFrame = CGRect(x: 0, y: lastFrame.maxY + 1.0, width: cvWidth, height: 200.0)

            var segmentRects = [CGRect]()
            switch segment {
            case .fullWidth:
                segmentRects = [segmentFrame]

            case .fiftyFifty:
                let horizontalSlices = segmentFrame.dividedIntegral(fraction: 0.5, from: .minXEdge)
                segmentRects = [horizontalSlices.first, horizontalSlices.second]

            case .twoThirdsOneThird:
                let horizontalSlices = segmentFrame.dividedIntegral(fraction: (2.0 / 3.0), from: .minXEdge)
                let verticalSlices = horizontalSlices.second.dividedIntegral(fraction: 0.5, from: .minYEdge)
                segmentRects = [horizontalSlices.first, verticalSlices.first, verticalSlices.second]

            case .oneThirdTwoThirds:
                let horizontalSlices = segmentFrame.dividedIntegral(fraction: (1.0 / 3.0), from: .minXEdge)
                let verticalSlices = horizontalSlices.first.dividedIntegral(fraction: 0.5, from: .minYEdge)
                segmentRects = [verticalSlices.first, verticalSlices.second, horizontalSlices.second]
            }

            // Create and cache layout attributes for calculated frames.
            for rect in segmentRects {
                let attributes = UICollectionViewLayoutAttributes(forCellWith: IndexPath(item: currentIndex, section: 0))
                attributes.frame = rect

                cachedAttributes.append(attributes)
                contentBounds = contentBounds.union(lastFrame)

                currentIndex += 1
                lastFrame = rect
            }

            // Determine the next segment style.
            switch count - currentIndex {
            case 1:
                segment = .fullWidth
            case 2:
                segment = .fiftyFifty
            default:
                switch segment {
                case .fullWidth:
                    segment = .fiftyFifty
                case .fiftyFifty:
                    segment = .twoThirdsOneThird
                case .twoThirdsOneThird:
                    segment = .oneThirdTwoThirds
                case .oneThirdTwoThirds:
                    segment = .fiftyFifty
                }
            }
        }
    }
 }
코드가 길지만 여기서 중요한 점은 cachedAttributes 프로퍼티 설정을 prepare()에서 한다는 점입니다. 그렇다면 요청을 받을 때마다 계산한다는 건 무슨 의미일까요?

바로 이 3가지 함수에서 계산을 하는 것입니다.

그중 하나인 layoutAttributesForItem입니다. prepare()에서 저장해둔 cachedAttributes를 사용하고 있지만, 여기서
UICollectionViewLayoutAttributes을 생성할 수도 있습니다.
Custom Layouts으로 할 수 있는 재밌는 동작들
이제 layout process에 핵심 method는 모두 탐구하였습니다. 이제는 선택적으로 구현해볼 수 있는 동작에 대해 간단하게 알아보겠습니다.
1. 콘텐츠 향상을 위한 Custom Supplementary Views 적용
UICollectionReusableView 상속을 받아야 합니다.
2. Custom Layout 에 Decoration Views 적용
Supplementary View와는 달리 데이터 소스와 독립적입니다. 말 그대로 장식용 뷰입니다. 하지만 layout 내부에서 재활용 구현 방식 때문에 Decoration View도 UICollectionReusableView 상속을 받아야 합니다. zIndex를 적절히 사용해서 뷰의 계층을 조절할 수 있습니다.
3. 애니메이션 조정하기
초기위치와 마지막 위치를 지정하여 셀이 삽입되거나, 삭제될 때 원하는 방식으로 셀 애니메이션 이동이 가능합니다.

4. 스크롤 동작 신기하게 바꾸기
UICollectionLayoutSectionOrthogonalScrollingBehavior에 있는 책 넘기는 것과 같은 paging 동작 등을 구현할 수 있습니다.
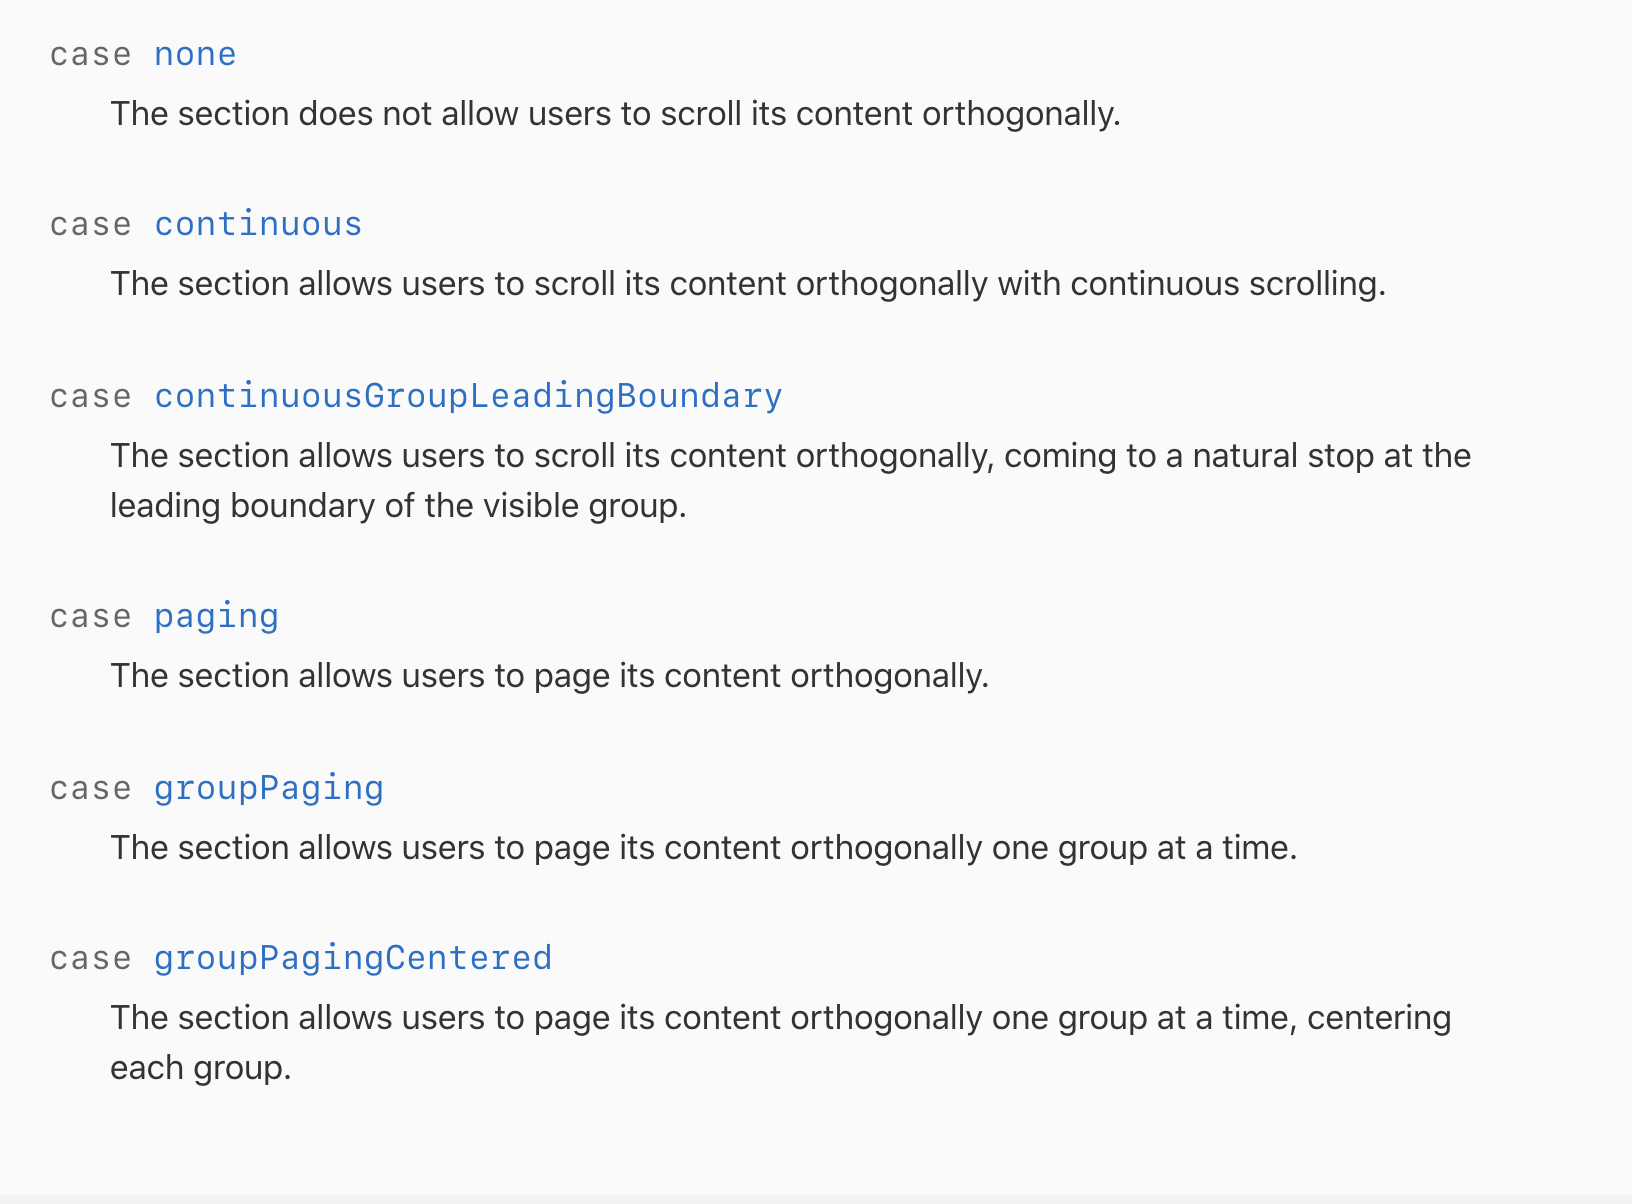
paging은 아래와 같은 동작입니다.

또한 아래와 같은 동작도 가능합니다. (3D처럼 보이기)

문서에 쓰여있는 Custom Layout Tips
1. 레이아웃이 자주 변경되는지 판단하여, 레이아웃을 캐싱할지 결정하십시오.
2. UICollectionView는 DataSouce와 Layout에 의존하기 때문에 상속할 일은 거의 없을 것입니다.
3. layoutAttributesForElementsInRect method 내에선 visibleCell을 알지 못하니 visibleCell함수를 호출하지 마십시오
4. Layout 객체는 항상 content area와 각 아이템의 attributes를 알고 있어야 합니다. 예외는 언제나 있습니다. 예를 들어, 지도에 항목을 표시하는 레이아웃은 DataSource에서 위치를 참조할 수도 있습니다.
마지막으로..

이런 레이아웃의 경우 어떻게 구현할 수 있을까요? CustomLayout?, ScrollView + CollectionView? 충분히 가능하지만 꽤 복잡해 보입니다.
이를 위해 iOS 13 이후로는 UICollectionViewCompositionalLayout을 지원합니다. 다음 글에서 이를 다뤄보겠습니다.
고찰
UICollectionView의 레이아웃을 설정하는 방법은
1. UICollectionViewFlowLayout 이용
2. UICollectionViewFlowLayout을 subclassing 해서 Custom FlowLayout을 구현 후 이용
3. UICollectionViewLayout을 subclassing 해서 Custom Layout을 구현 후 이용
입니다. 위로 갈수록 추상화가 되어 있습니다. 그만큼 아래로 내려갈수록 복잡한 기능이 구현 가능합니다. 애플에선 웬만하면 UICollectionViewFlowLayout만 이용해서 레이아웃을 설정하라고 권장합니다. Custom Layout을 이용하면 정말 신기하고 이상한 레이아웃을 만들 수 있지만 추상화가 제일 안 된 만큼 코드가 길어집니다. 그만큼 버그도 많아지고, 가독성이 떨어지고, 유지보수도 힘들어집니다. 만약 Custom Layout을 사용해야 한다면 이를 API로 만들어서 유지보수를 쉽게 만들어야 합니다.
References
www.raywenderlich.com/4829472-uicollectionview-custom-layout-tutorial-pinterest
www.raywenderlich.com/527-custom-uicollectionviewlayout-tutorial-with-parallax
developer.apple.com/documentation/uikit/uicollectionview
stackoverflow.com/questions/5958699/difference-between-margin-and-padding
iOS UICollectionView, 2nd Edition: The Complete Guide by Ash Furrow (2014)
developer.apple.com/documentation/uikit/uicollectionviewlayoutattributes
'iOS > iOS' 카테고리의 다른 글
| iOS 17에서의 URL 사용시 유의점 URL(string:) (5) | 2024.02.12 |
|---|---|
| iOS) UICollectionView custom layout에 대한 고찰- 2 (UICollectionViewCompositionalLayout) (9) | 2021.02.13 |
| iOS) GCD에 대한 고찰 - 2(DispatchWorkItem, DispatchGroup, DispatchSemaphore, Concurrency Problems) (0) | 2021.02.06 |
| iOS) GCD에 대한 고찰 - 1(Dispatch Queue) (1) | 2021.02.05 |


